[ содержание ]
The OziMC Dialog
This is the heart of OziMC, this is where the Features are selected for editing and
viewing.
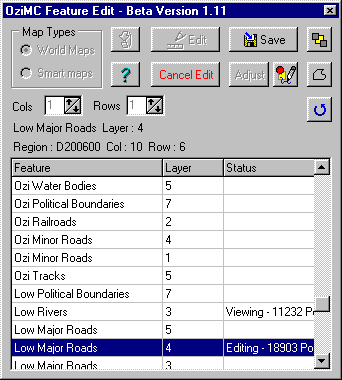
Press the OziMC button on the Tool Bar, the OziMC Feature Edit
dialog will be displayed.
World Maps

Note - This is a view of the OziMC screen for the registered version, the trial
version will have a reduced number of features available.
USA Smart Maps

Note 1 - This is a view of the OziMC screen for the trial version, the
registered version will not have the "unregistered" label beside the features,
and all features will be editable.
Note 2 - You will notice that Low Rural Roads layer 5 is listed twice, this is
how it is presented on the CD, you will find that data for different areas are in the
different listing, for any area you will need to check both these to find the one (or
perhaps both) which has the data.
The feature List
This shows the Features which are available for creating/editing.
You can see a list of Features, note that a feature can be listed more than once as a
feature can also have different layers.
Feature - Shows the type of feature, this determines how the map data is
displayed on the GPS screen.
Layer - The layer determines the zoom range in the GPS at which the feature can
be seen. This is fixed.
Status - Shows if the feature is being edited or Viewed etc.
The Features which start with "Ozi" such as Ozi Major Roads are initially
empty, these are provided for you to create your own roads etc.
The Features which start with "Low" such as Low Major Roads are the
original map data provided on the MapCreate CD. The data for the regions you specified in
CreateOziMC has been copied to your hard drive ready for editing. I have found most of the
road data for World maps is in level 4.
Double Click on a feature to load it for viewing (not editing), double click on
a feature being viewed to clear it ("Viewing" in Status field). It is useful to
be able to view other features when editing as features sometimes need to join together,
such as minor roads joining to major roads. However you cannot use any of the
"snap" track functions to join to features being viewed.
Map Types - Select World maps for the entire world coverage, note world
maps can be selected for the USA but there is no data available. Smart maps are
provided on for the continental USA.
Refresh Button - Rescans the library files and reloads them, used when you
change maps which may be in a different region and you want so see if you can edit within
the region, in other words did you include the region in CreateOziMC.
Edit Button - Calculates the map polygon for the centre of the map window and
reads the information from the OziMC data file which contains the Feature/Layer/polygon
and converts it to an OziExplorer track format. The track is displayed on the OziExplorer
map. The information about the calculated Feature/layer/polygon is displayed as text above
the list of features. The edges of the polygon will be displayed as a thick red line on
the map and MapView, the polygons for world map data are about 240 kilometres square so
chances are you will not see an edge on every OziExplorer map you are using.
Cols and Rows - For multiple polygon editing, these options specify how many
polygons each side of the central polygon are opened for editing. See the separate help
section on multi polygon editing for full details.
Save Button - Saves the Feature which is being edited into the OziMC data file.
Cancel Edit - Stops editing, if you have made any changes you will be prompted
if you want to save the changes.
 Check - loads and displays the
feature from the GPS map file where the full processing has been done, including the 60m
resolution, this gives an idea of how the feature will really look in the GPS.
 View GPS BackGround Map Data -
This is really only applicable to areas of the world immediately surrounding and within
the USA. This will show the map features which your GPS already has permanently loaded.
The data is only shown for the single polygon, depending on the map scale this may not
cover the whole map. If you move the map position and want to show the background you must
click the button off and on to reload new map data.
 Hide - Hides the window from view,
to get it back just press the OziMC button on the Toolbar again.
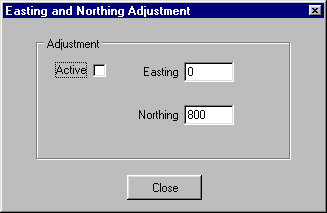
Adjust - This allows you to move the tracks in a feature selected for editing by
the amounts specified in Easting and Northing. These values have no units but are very
roughly close to metres. The purpose of this is to allow the original map data to be moved
into a more accurate position. It is not possible to move individual roads using this, it
works on all roads for a feature/layer/polygon at once. Once you are happy with the
adjustment, pressing the Save button saves the feature with the adjustment calculated,
from now on the adjustment is no longer required so uncheck the Active button,
unless you want to do some fine tuning.
The adjustments will only be applied to the feature if the Active checkbox is ticked.

[ содержание ]


